Liquid builder gel (BIAB) has taken the nail industry by storm in recent years, earning the nickname “the savior of soft nails.” It combines the structural support of hard gel with the convenience of gel polish, serving as a base coat, builder, and short extension all in one bottle. Although BIAB is widely used by nail bloggers, the learning curve is actually quite low. This article will strictly follow a standard 9-step flowchart to break down the correct BIAB application process step by step.
For this hands-on demonstration, we’ve selected products from Yougel—a Chinese nail supplier with extensive OEM/ODM experience—to recreate a complete, professional-grade BIAB application process, from buffing to sealing.
Why Is BIAB So Popular?
Before getting started, it’s important to understand the core logic behind BIAB. Traditional extension gels require paper tips and clear gel powder, making the process cumbersome and smelly. The biggest innovation of Liquid Builder Gel lies in its “self-leveling” property—its high viscosity ensures the gel doesn’t flow randomly, yet it self-levels slightly before curing, significantly reducing the amount of filing and shaping required.

BIAB products from professional manufacturers like Yougel typically offer a “three-in-one” function: they can serve as a base coat, a builder gel for strengthening, and for short extensions. One bottle does it all, making it ideal for nail salons prioritizing efficiency.
Preparation: Tools and Product List
Before you begin, ensure you have the following materials on hand:
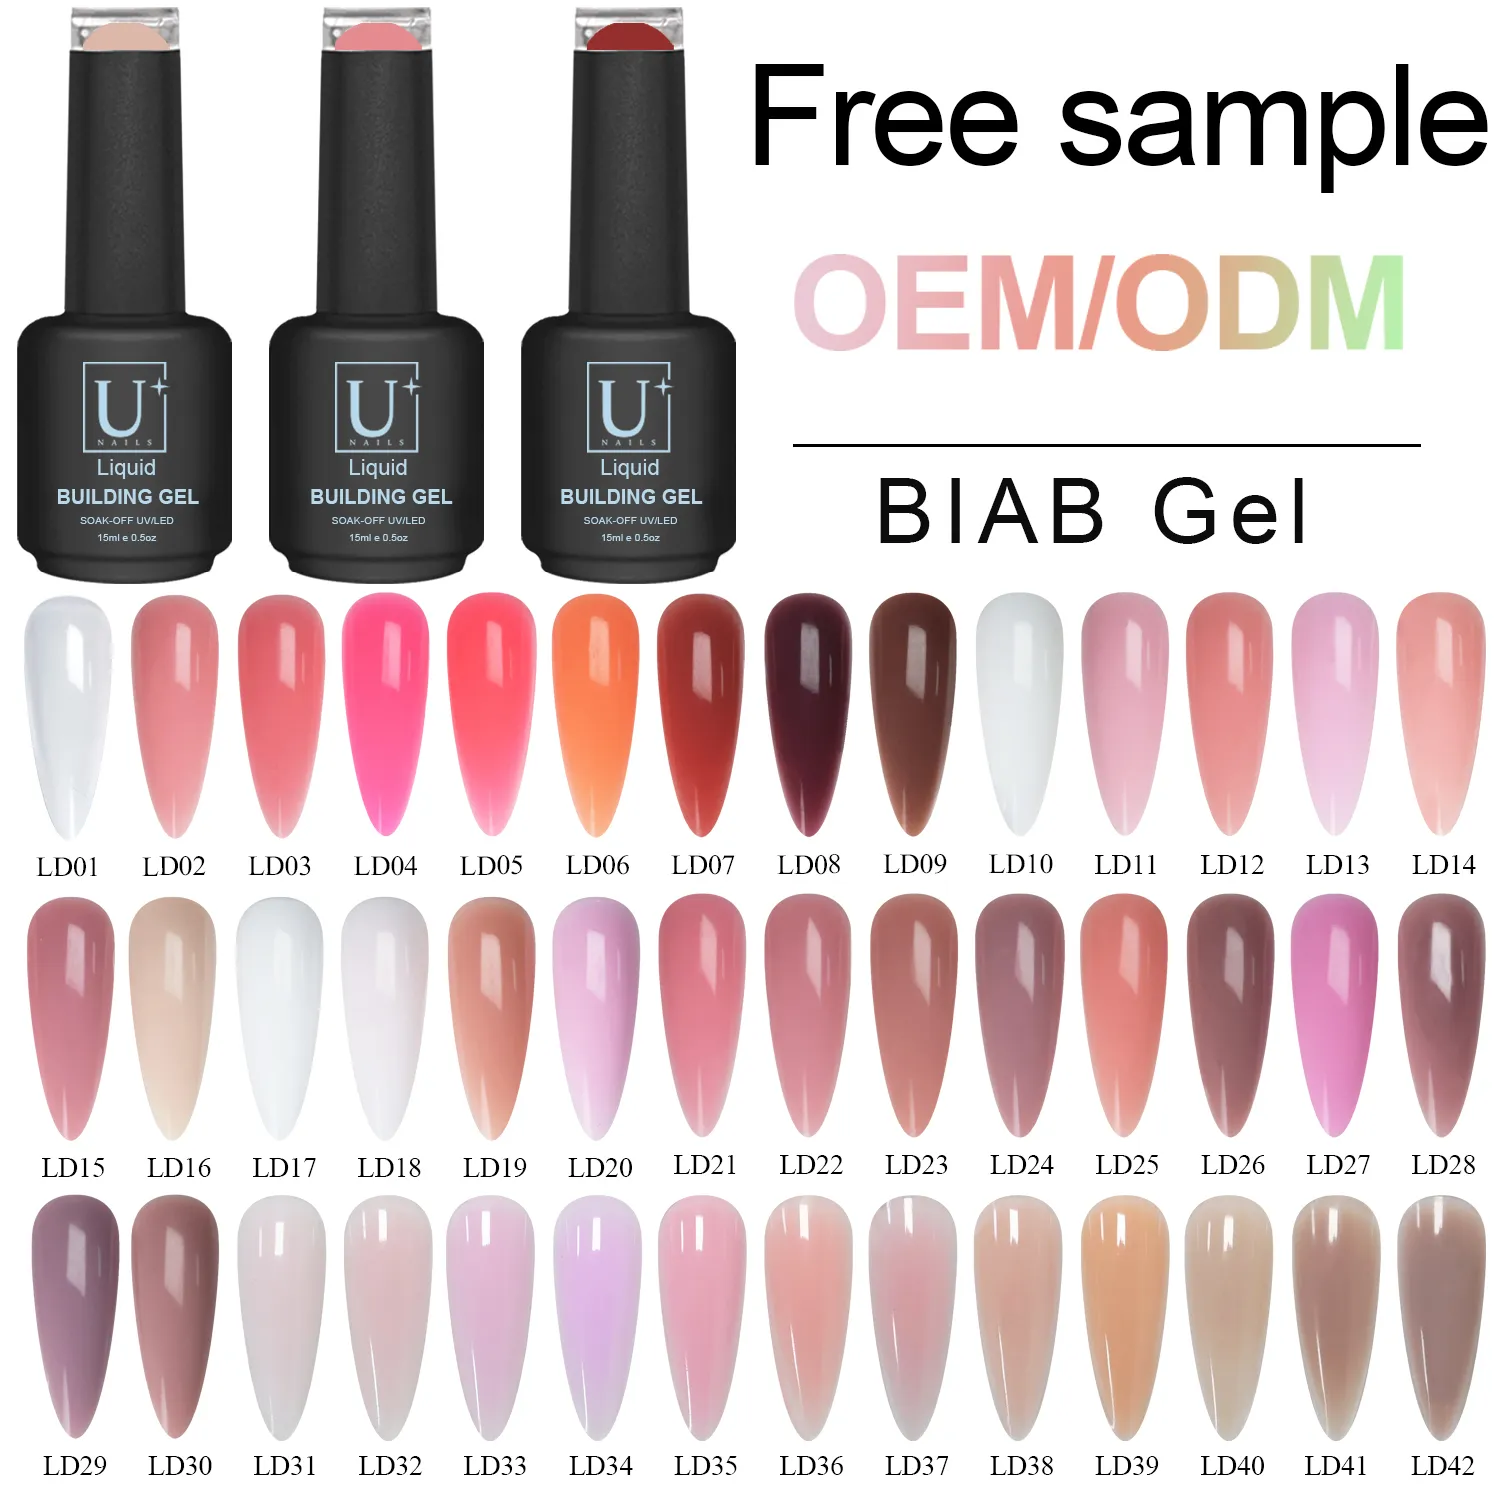
- Core Product: Yougel Liquid Builder Gel (BIAB) series — shades available to match different skin tones.
- Basic Tools: Cuticle pusher, cuticle nippers, sponge buffer, nail filing strips (180/240 grit recommended).
- Additional Supplies: Nail forms, slip solution/sanitizer, base coat, top coat.
- Curing Equipment: LED/UV lamp with 48W power or higher.
Detailed Procedure for Yougel Liquid Builder Gel (BIAB)
Step 1: Trimming, Buffing, and Shaping
Trim the nails and shape them with a file — squoval, oval, or trapezoid. Lightly buff the surface with a sponge buffer, not missing the sidewalls or tip.

Note: Good adhesion starts with a clean nail plate. Even Yougel‘s quality BIAB can lift if oil or dust remains. Always wipe the surface clean with a solution after buffing.
Step 2: Apply Base Coat & Cure
Take an appropriate amount of base coat and apply a thin layer to the nail surface. Be sure to cover the edges (including the tips). Place the nails under the LED lamp and cure for 60 seconds.

Note: Although some BIAB products claim to be “base coat-free,” based on actual testing, applying a dedicated base coat is the most reliable method to achieve maximum durability (lasting over 4 weeks).
Step 3: Place the Nail Form
Select an appropriate nail form (paper tip), adjust the curve, and position it snugly beneath the fingertip. This step is primarily for cases requiring nail extension or tip reinforcement. If you are only reinforcing your natural nails, this step can be skipped; proceed directly to Step 4.

Tip: Ensure the form is securely in place to prevent flowing gel from seeping underneath and forming “sagging gel.”
Step 4: Apply the First Layer of Liquid Builder Gel & Cure
Take out the Yougel Liquid Builder Gel. Since BIAB has a thicker consistency, it is recommended to apply it in small beads. Start about 0.5mm from the back edge of the nail and gently pull the gel downward to form an initial curve. Then place it under the LED lamp to cure for 60 seconds.

Step 5: Apply the Second Layer of Liquid Builder Gel & Cure (Building the Core)
Place a larger gel bead at the nail center — the key pressure zone. Pull it back with the brush tip to form an arch, then smooth it to both sides. Cure under LED for 60 seconds.

A quick note: Add another layer if the curve isn’t full enough. Just don’t pile on too much gel at once. A thick layer can trap heat during curing, causing an uncomfortable burning sensation — known as a heat spike.
Step 6: Remove the Nail Form
Carefully remove the paper form that was pressed against the nail. At this point, the nail should have a perfect extension curve.

Step 7: Wipe the Nail Surface (Remove Resin)
Dip a cotton pad in cleaning solution or gel remover and vigorously wipe the nail surface.

Note: Most BIAB gels are either soak-off or come with a sticky layer. This Yougel product forms a sticky layer after curing to prevent oxygen inhibition. This residue must be completely removed with a cleanser. Otherwise, it will clog your buffer blocks and reduce adhesion for the next coats.
Step 8: Shaping and Buffing
This step requires patience. Use a coarse buffing block (100/180 grit) to buff the sides of the nails (narrowing the cuticles for a slimmer appearance) and the surface (to level it). You can buff firmly at this stage, as the underlying hard gel has cured very firmly.

Shape Adjustment: Buff to create a perfect C-curve (arched curve) and smooth, flowing tip lines.
Step 9: Apply Top Coat & Cure
Use a fine-grit sponge buffer to gently polish the nail surface for a silky smooth finish. Wipe away dust, then brush on a no-wipe top coat. Cure under an LED lamp for 60 seconds.

The outcome: Nails turn out crystal clear with a glass-like shine and serious strength. Bend the tips with pressure — no cracks, no breaks. Solid enough for all your daily routines.
Real-Life Case Study: The Transformation from “Soft, Thin Nails” to “Perfect Fan-Shaped Nails”
Sarah, the owner of a nail studio in Australia, is a long-time Yougel customer. She has tried several European and American BIAB brands, with her feedback consistently focusing on “high prices” or “nails that are brittle and prone to breaking after curing.”
Last year, she ordered a batch of Liquid Builder Gel samples from the Yougel website and tested them on her clients with soft, fan-shaped nails. After following the standard 9-step process, the previously flat, curveless nail surface was visibly tightened, forming a beautiful C-curve. What pleased Sarah most was that this gel maintained excellent self-leveling properties even after two layers of application, requiring almost no filing or smoothing, which significantly shortened service time.
A follow-up two weeks later showed no lifting or breakage, and the nails remained straight even as they grew out. Sarah commented, “I used to swear by Japanese and Korean brands, but Yougel’s quality is just as good, and the cost is 40% lower.” Today, this BIAB gel has become her mainstay in her construction product line, with steady monthly repurchases.
Why Partner with Yougel?
For nail salon owners and brand managers who prioritize supply chain reliability, Yougel stands out as a trustworthy partner. Here’s why:
1. Great value: Factory-direct pricing with quality that matches top international brands.
2. Full certifications, smooth logistics: CE, MSDS, CPNP, and more are ready for hassle-free customs.
3. Low MOQ, reliable lead time: Start with just 5 units, and get delivery in 7 to 15 days.
4. Wide shade range, professional formulas: Over 42 colors available, covering diverse client needs in one go.
Summary
Using Liquid Builder Gel is not complicated; the key lies in selecting the right products and following standardized procedures.
As a professional nail product manufacturer in China, Yougel offers BIAB products with consistent quality and comprehensive certifications, and supports OEM/ODM customization. Contact us for samples and quotes—whether you’re a nail salon owner or a brand manager, it’s definitely worth a try.